If you don’t want to hire a professional photographer, you may follow these simple DIY newborn photography tips and photograph your baby as you want without worrying about safety. I’m a mother too and photographed my baby on my own. Here are several tricks and ideas to help you take cute photos of your own newborn and to make this process stress-free.
DIY newborn photography involves shooting babies no older than 2 months. It is one of the most challenging photography genres as you should be aware of all safety issues, pick a suitable shooting style along with newborn poses, know your way around lighting and props.
1. Don’t Shoot After 10 Days

If two weeks have already passed and you haven’t taken newborn photos yet, it might be too late and the results may not be as satisfying. The first 10 days is the best period for shooting since later newborns tend to be more restless during sleep. All the babies are different, however, still, it is recommended to photograph in the course of two weeks when the newborns sleep peacefully and better respond to posing.
2. Take Your Time

When you are the one who takes pictures of your own baby, you have practically all the time in the world. A photographer usually has to shoot and produce amazing results in the span of 3-4 hours. This period of time is extended for parents who try DIY baby photography; they have almost two weeks for shooting.
I highly suggest you not being in a hurry and take your time. If something goes wrong, you can always reshoot the next day. Only in this way, you will achieve stunning newborn images.
- Check out these cure newborn photo ideas.
3. Think about Newborn’s Safety

When you are dealing with more complicated baby picture poses and props, there supposed to be another person near to assist you and keep an eye on the newborn. Personally, I prefer more natural newborn images without intricate poses. My husband was always around even though I didn’t need much help. Keep in mind that all these newborn shots with complicated poses and scenes are combined from several pictures, not a single one.
4. Make Sure the Space Isn’t Cold

Once you have checked that the baby isn’t hungry, you need to make sure that the space is warm enough for the newborn’s comfort. It will be very hard to get great newborn photography poses if an air conditioner is turned full on. Even with the hot weather outdoors, the inside temperature should be optimal. When the newborn is cold, he/she won’t give you peace. Adjust the temperature in such a way that both you and the baby feel comfortable.
- Check out this Heater for controlling temperature in the room.
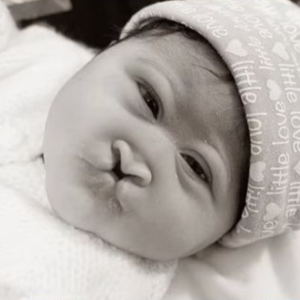
5. Find Cute Props
.jpg?w=790)
It isn’t necessary to purchase expensive props when photographing newborns. Feel free to experiment and look for adorable stuff. Use baskets, soft fabrics, beanies, blankets, bands or cute costumes. A cotton towel is a universal background for all kinds of baby shooting. Keep in mind that the material of the accessories shouldn’t harm a newborn. Stick to cotton, wool or paper.
- Check out cute and eco-friendly newborn photography props.
6. Make Sure the Camera is Clean and Stable

Check whether the camera lens isn’t stained. Use the Lens Pen Cleaning System. Do the same in case of shooting with the smartphone. I suggest using swaddles to clean up the camera. Once the camera is focused, catch your breath and snap a picture. Catching your breath, you reduce the chance of shaking when taking a shot.
- Check out the best camera for newborn photography.
7. Set Up a Tripod to Get into Your Own Shots